Friday, January 28, 2011

Reading Excel in VB- Connection Strings and Registry Edits

A client had a request to upload a .xls file and place the data into a SQL table.  At the time there was only the Microsoft Jet 4.0 engine in x86 (32bit).   The connection string for VB is:
myconnection = New System.Data.OleDb.OleDbConnection("provider=Microsoft.Jet.OLEDB.4.0;data source=C:\filename.xls;Extended Properties=" + Chr(34) + "Excel 8.0;HDR=Yes;IMEX=1" + Chr(34) + ";")
The problem was that as the code ran through the rows, some of the values would be returned as null even though there was data in the cell.  The reason this happens is that the reader is defaulted (in the registry), to look at the first 8 rows and determine the cell format.  The way to get around this issue is to edit the registry values.
HKEY_LOCAL_MACHINE>>SOFTWARE>>Wow6432Node>>Microsoft>>Jet>>4.0>>Engines>>Excel
We want to make sure that when there is a "Mixed Type" of data imported, we want the data read as Text, and we want set TypeGuessRows to 0, meaning scan all rows before deciding the format of the data.

As time progressed, the client decided that in 2010, people should be able to upload .xlsx files as well.  So I downloaded the appropriate 2007 Office System Driver Connectivity Components, which would only handle .xlsx files, not .xls files...  No worries, my connection string turned into:
 If LCase(Right(strFilePath, 3)) = "xls" Then
myconnection = New System.Data.OleDb.OleDbConnection("provider=Microsoft.Jet.OLEDB.4.0;data source=C:\filename.xls;Extended Properties=" + Chr(34) + "Excel 8.0;HDR=Yes;IMEX=1" + Chr(34) + ";")
End If
If LCase(Right(strFilePath, 4)) = "xlsx" Then
myconnection = New System.Data.OleDb.OleDbConnection("provider=Microsoft.ACE.OLEDB.12.0;data source=C:\filename.xls;Extended Properties=" + Chr(34) + "Excel 12.0;HDR=Yes;IMEX=1" + Chr(34) + ";")
End If
Pretty simple fix... 
A couple of weeks later I read about the 2010 Office System Driver Connectivity Components, which will handle .xls and .xlsx files, and can be downloaded here.  I uninstalled the 2007 package and installed the 2010, and went to update my connection string as per Microsoft's How to Use Instruction #2.
myconnection = New System.Data.OleDb.OleDbConnection("provider=Microsoft.ACE.OLEDB.12.0;data source=C:\filename.xls;Extended Properties=" + Chr(34) + "Excel 14.0;HDR=Yes;IMEX=1" + Chr(34) + ";")
This returned a "Could not find installable ISAM" error.  After searching and reading, I discovered that the only modifications necessary were to remove the "If/Then" statements.  My connection string now looked like:
myconnection = New System.Data.OleDb.OleDbConnection("provider=Microsoft.ACE.OLEDB.12.0;data source=C:\filename.xls;Extended Properties=" + Chr(34) + "Excel 12.0;HDR=Yes;IMEX=1" + Chr(34) + ";")
Everything ran well except now the .xls and .xlsx files were returning null values where cells had data.  Time to run Regedit.
HKEY_LOCAL_MACHINE>>SOFTWARE>>Wow6432Node>>Microsoft>>Office>>14.0>>Access Connectivity Engine>>Engines>>Excel
And just like before, we want set TypeGuessRows to 0.
2 folders below the Engines folder is the ISAM folder.  Take a look in there, and you will notice that the Excel 12.0 is for *.xlsb files, and that 12.0 Xml is for *.xlsx files.  My final connection string looks like this:
Dim myconnection As System.Data.OleDb.OleDbConnection = New System.Data.OleDb.OleDbConnection("Provider=Microsoft.ACE.OLEDB.12.0; Data Source=C:\filename.xl; Extended Properties=" + Chr(34) + "Excel 12.0 Xml;HDR=YES;IMEX=1" + Chr(34) + ";")
It's the only one needed for reading both .xls and .xlsx files.

Wednesday, January 19, 2011

Create the STSADM Path Variable for Server 2008

In my last blog I talk about adding the STSADM command path as the first line of your scripts.  However, you can just create a Variable Path that points to STSADM, and never worry about typing out it's location ever again from a command prompt.  Here is how to add a path variable in Server 2008.

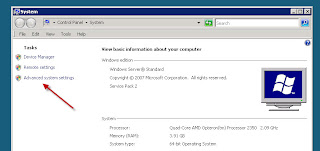
  1. Start menu --> right-click Computer --> Properties.
  2. From the Properties window, click Advanced system settings.
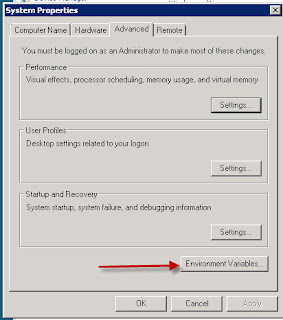
  3. Click Environment Variables.
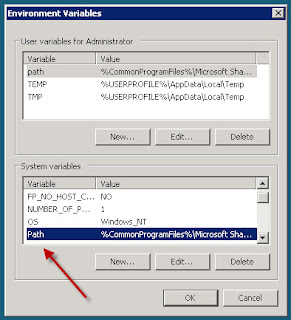
  4. Under System variables, scroll down and select the Path Variable --> Edit.
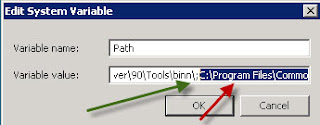
  5. Add a semi-colon (;) at the end of the last Variable value and paste in the path to STSADM:
C:\Program Files\Common Files\Microsoft Shared\web server extensions\12\BIN
       

Running STSADM Commands

I know that everyone and their mother has an opinion about how to deal with STSADM commands, so one more opinion won't hurt.
I suggest creating a folder on the C: drive called "Scripts", to store all of the batch (.bat) and command (.cmd) files that you create/run.  It is a lot easier to edit the files in Notepad than it is to retype the whole STSADM command when you make a mistake.  Also, if you blow up your farm, you have a record of all scripts run in case you have to rebuild.
The first thing to do when creating a script for SharePoint 2007 is to add the STSADM path as the first line:
cd C:\Program Files\Common Files\Microsoft Shared\web server extensions\12\BIN
Then write your STSADM command(s)
The last line of your script should be:
Pause
This will allow you to see the errors or successes without the cmd window closing.
Please remember to right-click the script and Run as Administrator.

    Monday, January 17, 2011

    Sync Active Directory to SQL


    I have found that one of the most useful things to have sitting in a SQL database is User Information from Active Directory. The information can then be displayed using a data view web part. It's also useful for things like a custom content query web part that pulls information based on current user, or pull-down lists in InfoPath. The options really are endless.

    Purpose

    Our goal is to create a Timer Job that will take user information from Active Directory and put it into a system user table within SQL. We will only be getting some of the user information available within AD. You can download a couple of documents that have more information on different properties within AD. I do not remember where I downloaded these documents, I did not create them, but they were both very useful on a couple of projects: 
    Get AD Documents

    The one piece of information that is a wee bit tricky to get is the user's last logon date and time (lastLogon). The lastLogon property is stored on EACH domain controller for each user in AD, meaning that to get the correct last logon time we will have to get the information off each domain controller. Another interesting piece of information is that the lastLogon value is the "number of 100 nanosecond intervals since January 1, 1601 (UTC)."

    I am running two domain controllers, so the examples are for getting the information back from 2 domain controllers.

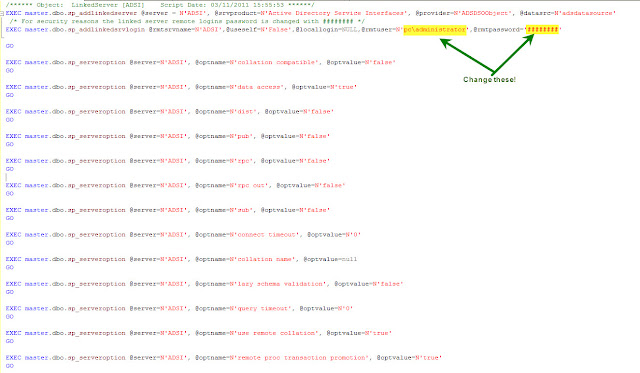
    The first thing we need to accomplish is to create a Linked Server, Server Object called ADSI.

    Create the ADSI

    Active Directory Services Interface (ADSI) allows us to talk to Active Directory.

    The next step is to create a temporary table to store the information that has been pulled from Active directory.

    Create the Temp Table


    If you are going to bring back the lastLogon value, create a column for each of the Domain Controllers.

    Create the System User Table

    Get User Table SQL script here


    Create a Scalar-valued Function
    As far as I know, there is not an easier way to compare values within a single row than creating a function to compare values for us. Once again, depending on how many domain controllers you have, will determine the number of columns to compare.


    Get the Information

    Depending on how many Domain Controllers you have, you will have to adjust your scripts to match your tables.  Also, this script will only bring back 1,000 records at a time, due to a default paging setting in AD.  You can either get the admin to change the setting (not a good idea) or create an additional filter to bring back the users in chunks.  I would suggest filtering on the sAMAccountName, and bring back the users that have names that start with A-C, D-F,G-I,...  you get the idea.  So lets test...


    Press F5 (Execute!)

    Get Test SQL script here
    This script should bring back all "Person(s)" and "User(s)" within the CN from AD. I have added a filter to remove anyone named 'Administrator' and 'Guest' as well.  I added the homePage for the fun of it for the test, and will not be importing the information within the Stored Procedure.

    Once we have all the information being returned, we can go ahead and create a stored procedure so that the timer job will have something to run!

    Create the Stored Procedure

    I prefer to use the drop/create method before populating the Temp Table, but feel free to use an update command to modify the existing information. 

    1)  Create a New Stored Procedure.
    2)  Go to your Temp_ADUsers table (right click) --> Script Table as --> DROP And CREATE To --> New Query EditorWindow.
    3) Copy Paste the script into the new stored procedure, remove the "Go" statements since you cannot use them in stored procedures.
    4) Add the 1st AD script to insert the Users into the Temp_ADUsers table.
    5) Add the 2nd AD script to insert the lastLogon from the second Domain Controller.
    5) Add the script to update the current users, the ones that are already in the database.
    6) Add the script that inserts new users into the database.

    On the update, we have done a couple of things, such as change the userOrganization to a blank if NULL, and drop the email address if their account has been deactivated in AD.  We do not want to send emails to people who are deactivated from the system...  And we have done the math to figure out the lastLogon time.

    On the insert, we will set their ReadOnly column,  their System_Role, and do the math for lastLogon.

    Create the Timer Job

    There are several ways to create a timer job, this is the way that I do it...
    After we create the stored procedure, right click the procedure and select Script Stored Procedure as --> Execute To --> Agent Job...

    Fill in your timer information...  NOTE:  This is only a temporary timer job...

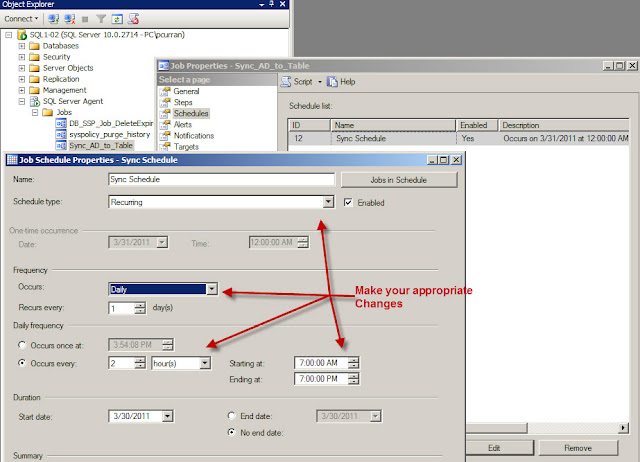
    Now we expand out SQL Server Agent, and Jobs, and look for our new timer job.  Open up the properties of our new timer job, go to the Schedules Page, and modify the schedule:


    Right click your new timer job and select Start Job at Step...  and you should get a Success message or two!

    Conclusion
    You should now be able to synchronize Active Directory from 2 domain controllers into one SQL Table every 2 hours from 7am to 7pm.